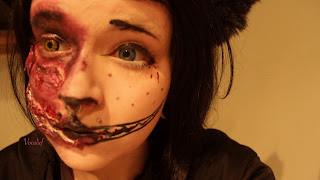
I have had a bit of a hiatus from blogger, I've started my foundation year and it super time consuming so I hope to get back into blogging more soon. For now have an up to date makeup tutorial.
Last year I designed a cheshire cat makeup look and it went okay but I decided to improve it this year, I also posted a tutorial on it here so I thought I'd post a new one as I think I have improved.
These are pictures from actual Halloween, I tried to re-create the look again for this tutorial, still better than last year.
Let's begin~
First I recommend is circle lenses, I used two different lenses from LensVillage
Reviews for blue and yellow
Also I put on foundation and concealer on (mainly on the good side, not much point on the other)
Then I mixed glue and sfx wax, to make the consistency a bit thicker, and placed it where I want the mouth and around my eye.

And then I tore up tissue paper and placed it on, you probably need to put glue over the top to make sure it sticks.
Then leave it to dry and start on the 'good side'.
My eye makeup, simple eye enlarging makeup. I didn't know how to make a 'cat eye' but I think this looks okay. I used liquid liner, faceprint chalk for the white and red under and then red liquid liner for blood.
Then I used the same white chalk to start drawing the mouth. I also prime with eyeshadow.
Then use liquid liner to line the mouth and draw teeth.


Then use liquid liner blood, or you can use fake blood but eyeliner is easier to control and clean off.
Now you can start adding more gore~
Paint over and around the tissue.
I use paint from poundland, these colours are really good, black for depth, purple and blue for bruising and red for blood.
The natural light then disappeared so sorry the rest of the images don't have the nice lighting ;~;.
I restuck a few tissue bits and then remembered I forgot to add the nose and whisker dots. >.< oops
Then I added more red liquid liner to the little cracks on paper still visible.
And the core is finished~.
I also thought I finished the 'good side' however...


Thank you for reading~


No comments:
Post a Comment